Getting Started with Open-Source GIS: Primer
mattwigway
I was talking to some friends at school tonight, and I realized what a barrier it can be to actually get some of the open-source geospatial tools I’ve talked about on this blog going. So I’m going to start a series about how one can get started with these tools, from a level-zero technical knowledge (of course, I assume basic GIS knowledge—if you know what I mean when I say buffering, geocoding and vector analysis, you’re fine). I’ll be approaching it from the standpoint of a Windows user (although OS X users with Intel Macs should be able to follow the same instructions, and if you’re a Linux user, you should have no problem).
This is the first post in the series “Getting Started with Open Source GIS.” Hopefully, by the time the series is over, you’ll have a good understanding of how to use open source tools to complement or replace the tools you use now. I think open source GIS can especially be a boon to organizations that can’t afford (or can’t justify) a proprietary GIS solution at all.
Note: to follow these instructions, you’ll need to have:
- Lots of disk space - at least 12GB available, preferably 20-30GB (it’s OK if it’s on an external hard drive as long as the drive is reasonably fast).
- Lots of RAM - at least 1GB (more if you’re running a recent version of Windows, e.g. 7 or Vista). If you have 2GB+ you should be fine. RAM is also not that expensive, and it speeds up computers tremendously.
- If your system doesn’t meet these requirements, you can get a live DVD or a USB drive from OSGeo Live (link below), then run it from that with 512MB of RAM and no disk space required.
Fortunately for us, our own Open Source Geospatial Foundation packages almost all of the tools, together with a variant of the Xubuntu Linux operating system, in one file, that we can install easily into a virtual machine (If you don’t know what a virtual machine is, check Wikipedia). All of the software I’ll be using in this series is open source, so of course I’m using an open source virtual machine platform: VirtualBox. Download and install the latest version (4.0.4 at this writing). This will differ depending on your platform, so I won’t provide instructions here; their website has some instructions, and Google is always there. Once you have VirtualBox installed, come back here (you don’t need to set up a virtual machine yet).
Now, we need to download the virtual machine file from OSGeo Live. Click on the ‘Download’ link, then choose ‘osgeo-live-vm-<version>.iso’ (I used version 4.5, if you use a later version, your graphics may differ slightly but these instructions should still apply). Wait a long time while it downloads—this is probably the biggest file most people will ever download (side note: if you get your internet via 3G, ham radio or passenger pigeon, which are all accepted internet routing protocols, there may be a maximum amount you can download each month before they hit you with charge or cut off your connection; be careful and try to borrow someone else’s high-speed connection).
Next, we need to unpack the file. Windows users should install 7-Zip. Mac users should look at Keka (note: I haven’t used Keka, but a quick Google search indicates that it has pretty good reviews). Linux users: look for p7zip in your distribution’s package manager. Once you’ve unpacked the file (and know where the unarchived .vmdk file is), come back here.
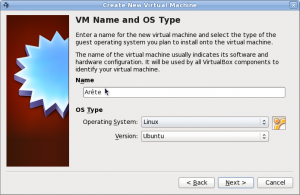
Open up VirtualBox. Click ‘New’. In the window that appears, give the machine a name, and select Operating System -> Linux, Version -> Ubuntu. Click ‘Next’.
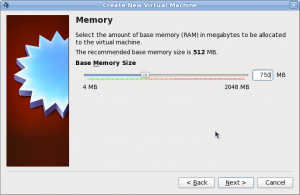
On the next screen, you will configure the amount of your RAM this virtual machine has dedicated to it. OSGeo Live requires at least 512MB, I suggest more - I suggest dragging the slider to the top of the green. (note to power users: I’ve had success running VMs in the orange if I’m not doing much else with the system. You can’t boot a VM in the red). Click ‘Next’.
 ]
]
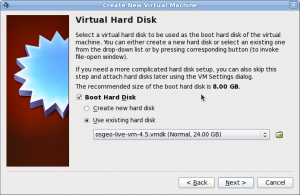
On the ‘Virtual Hard Disk’ screen, deselect ‘Create new hard disk’ by clicking on ‘Use existing hard disk.’ Press the ‘browse’ button (folder with arrow to right of menu) and select the .vmdk file you extracted (not the .vmx!). Click ‘Next’.
Review the settings and click ‘Finish’.
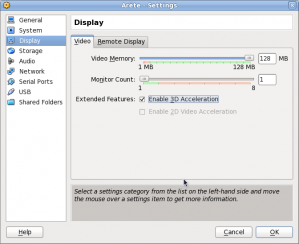
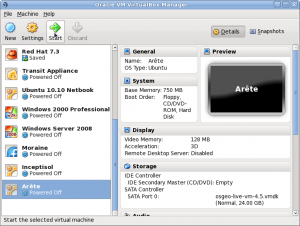
There are a few more tweaks we want to make to our configuration to make the GIS software run better. In the left pane of the main VirtualBox window, select the machine you created, then click ‘Settings’. Choose ‘Display’ on the left side, and drag video memory to it’s maximum. Also check ‘Enable 3D Acceleration’, if it’s not gray.
In the main VirtualBox window, select your machine and click ‘Start’ (note: I have about 12 virtual machines on my computer - you probably only have one.)
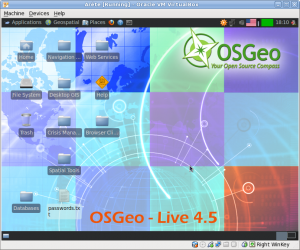
Wait a while while the machine starts up. It will eventually go to an ‘Automatic Login’ screen - just wait until it logs in automatically. Eventually, you’ll see this:
There’re a few more things we need to do. Click Applications -> Ubuntu Software Center, and search for ‘virtualbox-ose-guest’; install the packages ‘virtualbox-ose-guest-x11’ and ‘virtualbox-ose-guest-utils’ (the names are below the bold headings). When it asks for a password, enter ‘user’.
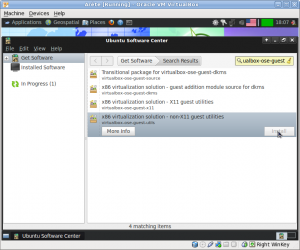
When both installs are complete (i.e., the green ‘in progress’ icon in the left panel goes away), reboot the virtual machine with Applications -> Log Out. Click ‘Restart’.
I wasn’t able to get shared folders working with the OSGeo install—I’ll look into that later. For now, I recommend a service like Dropbox to sync files between your physical and virtual machines.
Look at all of the programs under the ‘Geospatial’ menu! Have fun! (and I’ll post some tutorials here soon). You might want to look at this overview video of the applications provided.